Georgian recipes are everywhere now. You can find khachapuri instructions on a hundred food blogs. But most of them skip what actually matters: the techniques. Georgian cooking isn't complicated — it's actually refreshingly straightforward compared to, say, French cuisine — but it relies on a handful of methods that you won't find in any Western culinary tradition. Master these, and every Georgian dish you make will taste dramatically better. Ignore them, and you'll wonder why your satsivi tastes like seasoned mayonnaise.
This guide covers the core techniques that Georgian home cooks learn by watching their mothers and grandmothers. No one writes them down in Georgia because everyone just knows them. That's exactly the problem when you're learning from a different kitchen tradition.
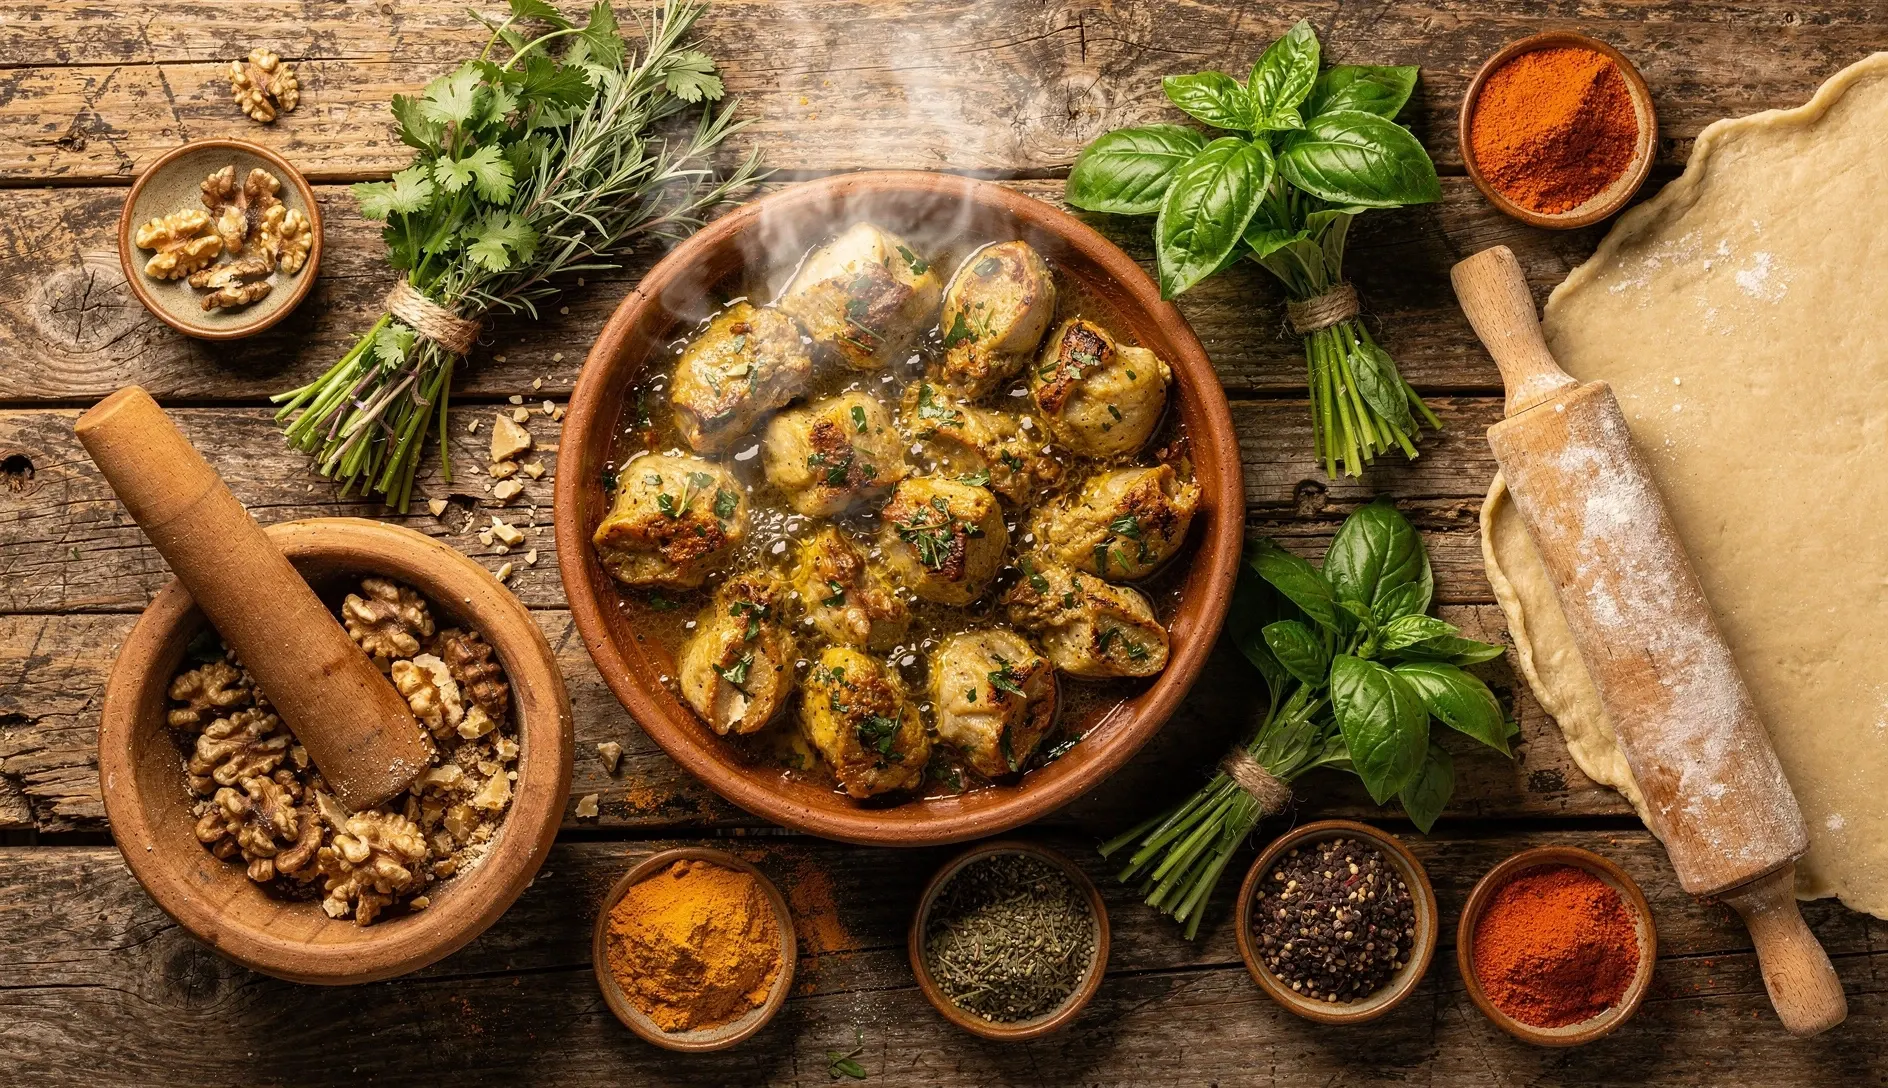
Ketsi Cooking: The Clay Pan That Changes Everything
If there's one piece of equipment that defines Georgian cooking, it's the ketsi (კეცი) — a flat, unglazed clay pan that goes directly over flame or into the oven. Think of it as Georgia's answer to the cast iron skillet, except it's been in use for several thousand years longer.
The magic of ketsi cooking is even, gentle heat distribution. Clay doesn't create hot spots the way metal does, so food cooks more uniformly. More importantly, unglazed clay absorbs fat over time, developing a natural seasoning that makes food stick less and taste better the more you use it. A well-seasoned ketsi that's been in a Georgian family for years will produce food that a brand-new one simply can't match.
What You Cook in a Ketsi
| Dish | What Happens | Why Ketsi Matters |
|---|---|---|
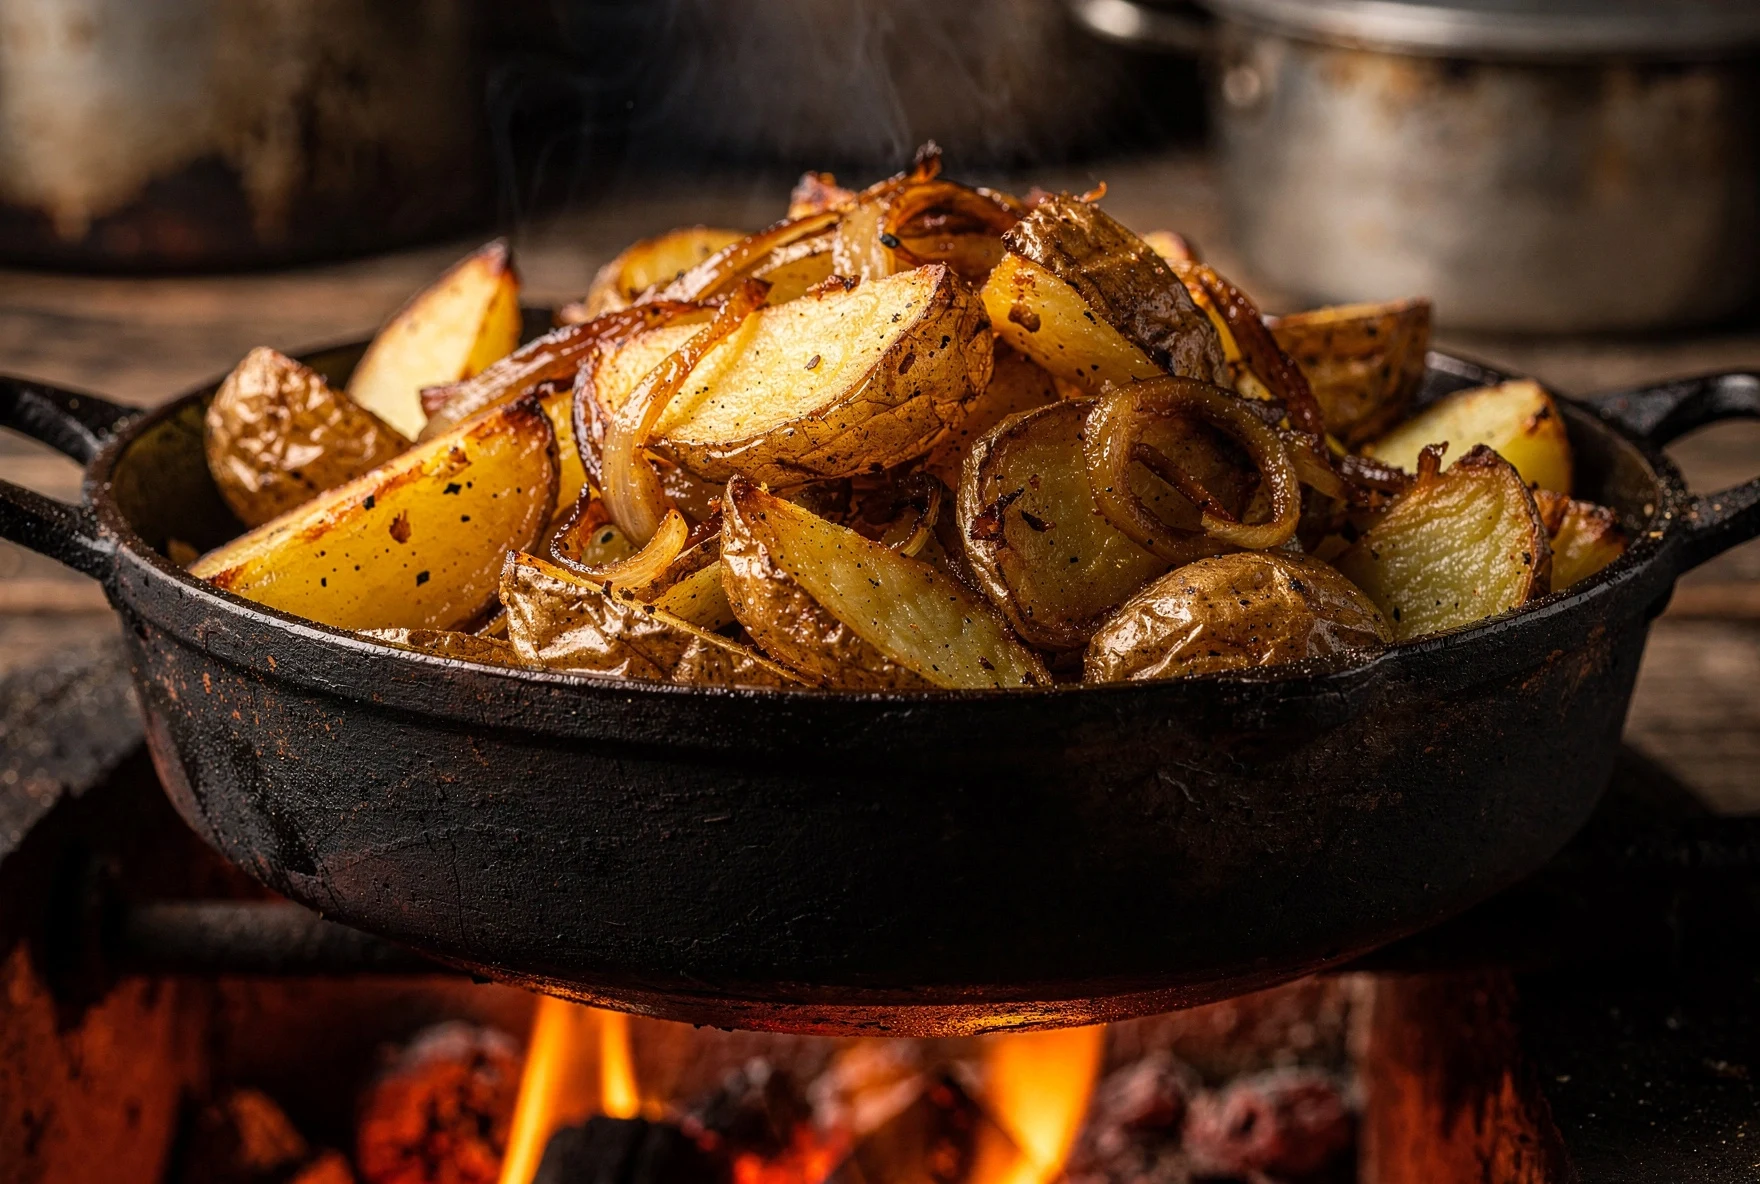
| Ojakhuri | Potatoes and meat seared, then baked | Clay crisps the potatoes evenly without burning |
| Shkmeruli | Chicken browned, then braised in garlic-milk sauce | Sauce reduces gently without scorching |
| Soko Ketsze | Mushrooms baked with butter and sulguni | Clay keeps bubbling cheese perfectly molten |
| Chirbuli | Eggs poached in spiced tomato-walnut sauce | Even heat sets eggs gently without rubbery edges |
| Chanakhi | Lamb and vegetables layered and slow-baked | Clay pot retains moisture over long cooking |
Seasoning a New Ketsi
A new ketsi needs seasoning before first use, or food will stick and it may crack from thermal shock. Here's the traditional method:
- Soak it. Submerge the ketsi in cold water overnight. Clay is porous — this fills the microscopic pores and prevents cracking.
- Dry it completely. Let it air dry for 24 hours. No shortcuts.
- Oil it generously. Rub the cooking surface with sunflower oil (not olive — too low a smoke point for this). Get into every pore.
- Bake it empty. Put it in a cold oven, bring to 200°C (400°F), hold for an hour, then let it cool inside the oven. Never take hot clay into cold air.
- Repeat the oil-bake cycle two more times. By the third round, the surface will have a slight sheen.
The Golden Rule of Clay
Never subject a ketsi to sudden temperature changes. Always start it in a cold oven or over low flame and bring up gradually. Cold ketsi into a hot oven = cracked ketsi. Hot ketsi on a cold counter = also cracked ketsi. Think of clay as something that needs to be warmed up gently, like a stiff muscle.
Substitution: If you don't have a ketsi, a well-seasoned cast iron skillet is the closest substitute for stovetop-to-oven dishes. For slow-baked dishes like chanakhi, a ceramic Dutch oven works. Neither will give you exactly the same result — cast iron runs hotter and clay keeps food moister — but you'll get 80% of the way there.
The Tone Oven: Baking on Walls
The tone (თონე) is a cylindrical clay oven sunk into the ground, heated by a wood or gas fire at the bottom. Bread dough gets slapped directly onto the inner walls, where it bakes from radiant heat while gravity tries to pull it off. It's dramatic, slightly dangerous-looking, and produces bread that no conventional oven can replicate.
Every neighborhood in Tbilisi has at least one tonis puri bakery — usually a small shop with a hole in the floor where a person leans in (sometimes headfirst, held by an assistant) and peels finished loaves off the walls with a long hook. The whole process takes about 8-10 minutes per batch.
Why Tone Bread Tastes Different
Three things happen in a tone that don't happen in a regular oven:
🔥 Extreme Radiant Heat
The tone interior reaches 300-400°C (575-750°F). At these temperatures, the crust forms almost instantly while the interior stays pillowy. A home oven maxes out at 250-275°C — not even close.
💧 Steam Environment
The dough's moisture creates steam in the enclosed chamber. This keeps the surface soft long enough for maximum oven spring before the crust sets — which is why tone bread has that characteristic puffy, blistered texture.
🧱 Direct Contact
The dough bakes directly on hot clay, not on a metal surface or rack. This creates the slightly charred bottom and the way the bread tears cleanly where it was attached to the wall — that signature uneven edge.
⏱️ Speed
8-10 minutes total. Fast baking at extreme heat means the crust caramelizes and chars in spots while the crumb stays incredibly moist. Longer, lower baking dries bread out — a problem every home baker fights.
Replicating Tone Bread at Home
You won't get an exact match, but you can get surprisingly close. Preheat a pizza stone or inverted baking steel at your oven's maximum temperature for at least an hour. Put a cast iron pan on the bottom rack and pour in boiling water when you load the bread — this creates the steam environment. Bake for 8-10 minutes. The result won't have the char spots or the wall-tear texture, but the crust-to-crumb ratio will be much closer than standard bread baking. See our shotis puri recipe for the full method.
Breads That Come from a Tone
| Bread | Shape | Notes |
|---|---|---|
| Shotis Puri | Long canoe shape, pointed ends | The most common Georgian bread. Crisp crust, soft center. |
| Tonis Puri | Round, flat disc | Same dough as shotis puri, different shape. More surface area for tearing. |
| Lavashi | Thin, large sheet | Georgian lavash — thicker than Armenian, used for wraps and with cheese. |
| Nazuki | Round, decorated surface | Sweet bread with cinnamon and cloves. Specialty of Surami (central Georgia). |
| Lobiani | Flat round, bean-stuffed | Bean-filled bread baked on the tone wall. Street food staple. |
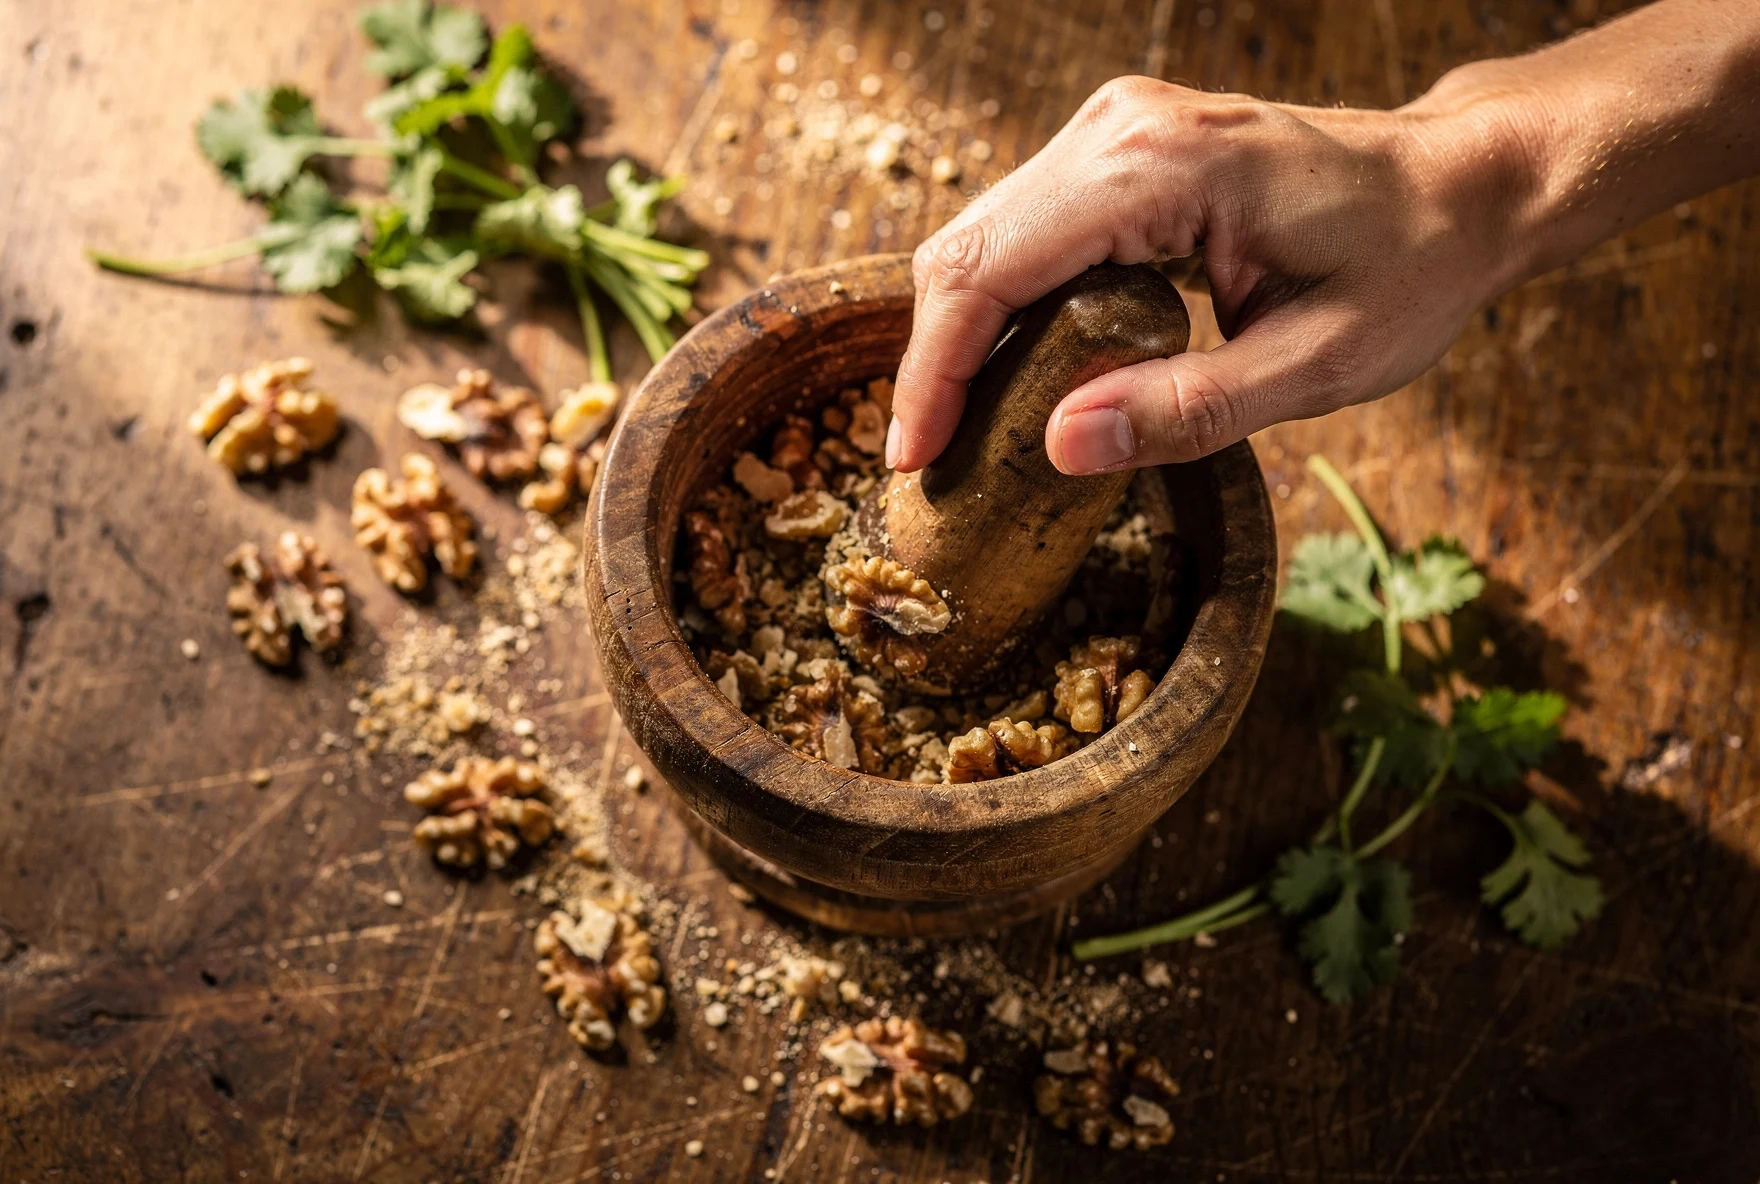
The Walnut Paste Method: Georgia's Secret Weapon
If you learn one Georgian technique and nothing else, make it this one. Walnut paste — walnuts ground with garlic, herbs, and spices into a thick, creamy base — is the foundation of at least a dozen major Georgian dishes. It's the reason Georgian vegetarian food is so satisfying: walnut paste provides the richness and body that other cuisines get from cream or butter.
The basic ratio never changes much: walnuts + garlic + fresh cilantro + ground coriander + blue fenugreek + salt. What changes is the liquid you use to thin it and the additional spices for each dish.
The Walnut Paste Family
| Dish | Thinned With | Consistency | Used For |
|---|---|---|---|
| Satsivi | Chicken or turkey broth | Pourable sauce | Cold sauce over poultry (New Year's centerpiece) |
| Bazhe | Water or light broth | Thin, pourable | All-purpose cold sauce, especially with fish and chicken |
| Pkhali | Vegetable liquid (squeeze of blanched greens) | Thick paste | Mixed directly with chopped greens, pressed into shapes |
| Badrijani Nigvzit | Vinegar + water | Spreadable filling | Spread on fried eggplant slices, rolled up |
| Gebzhalia | Mint-infused liquid | Thin sauce | Poured over cheese rolls (Megrelian specialty) |
The Actual Method
Here's what most online recipes get wrong: they tell you to use a food processor. You can, and it works, but the result is noticeably different from the traditional mortar-and-pestle method.
A food processor chops walnuts into uniform tiny pieces. A mortar crushes them unevenly — some parts become an oily paste that releases walnut fat, while other parts stay as small crunchy bits. This textural variation is what makes hand-ground walnut paste taste more complex and feel more interesting in your mouth. It's the difference between smooth peanut butter and chunky, except more pronounced.
- Start with room-temperature walnuts. Cold walnuts don't release their oils as readily. If they've been in the fridge, let them sit out for an hour.
- Crush the garlic first. Put 2-3 cloves in the mortar with a pinch of coarse salt (the salt acts as an abrasive). Pound to a paste — this takes 30 seconds.
- Add walnuts in batches. Don't dump all 200g in at once. Start with a quarter, grind that down to a rough paste, add the next quarter. The already-ground portion helps break down the fresh walnuts.
- Add dry spices midway. Ground coriander, blue fenugreek (utskho suneli), and a pinch of cayenne go in once the walnuts are half-ground. They integrate better this way.
- Add fresh herbs last. Cilantro (and sometimes parsley or tarragon, depending on the dish) goes in at the end with just a few strokes — you want to bruise the herbs into the paste, not pulverize them.
- Thin to the right consistency with your chosen liquid. Add a tablespoon at a time and mix. You can always add more liquid; you can't take it out.
The Food Processor Compromise
If you're making a large batch (for satsivi especially, which needs a lot), use the food processor for the rough chop, then finish by hand in a mortar for the last minute. Pulse — don't run continuously, or you'll make walnut butter. 3-4 pulses of 2 seconds each gets you to the right starting point.
Slow Stewing: Patience as Technique
Georgian stews don't use thickeners. No flour, no cornstarch, no roux. The sauce thickens entirely through reduction and the natural breakdown of vegetables — particularly tomatoes and onions. This means Georgian stewing is fundamentally about time and low heat.
The standard approach: brown your meat over high heat, remove it, sweat onions in the rendered fat until deeply golden (20-30 minutes — not the 5 minutes that most recipes claim), add tomatoes and spices, return the meat, and then barely simmer for 1-2 hours. The key word is barely. You should see a lazy bubble every few seconds, not a rolling boil. Boiling toughens meat and makes the sauce taste flat.
Chashushuli
Beef stewed with tomatoes, onions, and hot peppers. The leanest, most intense of the Georgian stews. Cooks for 2+ hours until the sauce is almost a glaze.
Chakhokhbili
Chicken stewed in tomatoes with masses of fresh herbs added in the last 10 minutes. The herbs are the whole point — they wilt into the sauce but stay bright.
Chakapuli
Spring lamb with sour plums and tarragon. Uniquely Georgian — no tomatoes, just tkemali and white wine for acidity. The lightest, brightest stew in the canon.
Kharcho
Beef and walnut soup-stew with rice. Thickened by the walnut paste and rice starch, not by reduction. Spiced with khmeli suneli and saffron substitute (dried marigold).
Common Stewing Mistakes
| Mistake | Why It Happens | The Fix |
|---|---|---|
| Watery sauce | Heat too high, lid on too tight | Cook with lid ajar so steam escapes. Low heat. |
| Tough meat | Boiling instead of simmering | Keep below 95°C. Lazy bubbles only. |
| Flat flavor | Adding all herbs at the beginning | Add dried spices early, fresh herbs in the last 5-10 minutes. |
| Mushy vegetables | Adding everything at once | Stagger: hard vegetables first, soft ones in the last 30 min. |
The Tabaka Technique: Flat and Crispy
Chicken tabaka (ტაბაკა) is named after the tapa — a heavy flat-bottomed pan with a weighted lid. The technique is dead simple: butterfly a chicken (or better, a small Cornish game hen), season it, press it flat in a hot pan under a heavy weight, and cook until the skin is shatteringly crispy on both sides.
The weight is the whole technique. It forces maximum skin contact with the hot pan surface, which renders the fat out and crisps the skin uniformly. Without the weight, you get patches of crispy and patches of flabby — which is what most roasted chicken looks like.
How to Do It Right
- Butterfly the bird. Cut along the backbone with kitchen shears, open it flat, and press hard on the breastbone until you hear it crack. The bird should lie completely flat.
- Dry the skin thoroughly. Pat it with paper towels, then ideally let it sit uncovered in the fridge for a few hours (or overnight). Dry skin = crispy skin.
- Season simply. Salt, black pepper, maybe a little ground coriander. The charm of tabaka is its simplicity — the technique does the work, not the seasoning.
- Hot pan, skin side down. Medium-high heat, a good amount of oil or clarified butter. Place the chicken skin-side down.
- Apply the weight. A second heavy pan (cast iron is ideal), a foil-wrapped brick, a pot filled with water — anything that gives you 2-3 kg of consistent downward pressure.
- Don't touch it for 15-20 minutes. Resist the urge to peek. You'll hear it sizzling aggressively — that's correct.
- Flip once, weight again, 10-15 more minutes. The skin side should be deep golden-brown and crispy. The flip side cooks faster because the bird is already mostly cooked through.
The Garlic Sauce Is Non-Negotiable
Tabaka is always served with a raw garlic-vinegar sauce: crushed garlic + white wine vinegar + a splash of water + salt. That's it. The sharp, punchy acidity cuts through the richness of the crispy skin. Without it, tabaka is just good fried chicken. With it, it's transcendent.
Khinkali Pleating: The One That Takes Practice
Let's be honest: khinkali pleating is the only Georgian technique that's genuinely difficult. Everything else in this guide, a determined beginner can nail on the first or second try. Khinkali pleating takes a dozen attempts before it starts looking right.
The goal is to gather a round of dough around a ball of seasoned meat filling, creating at least 18-20 pleats that twist into a topknot at the top. The topknot (the "handle") is traditionally not eaten — it's there to hold the dumpling while you bite into the side and slurp out the juice first.
The Pleating Method
- Roll the dough thin but not paper-thin. About 2mm — thick enough to hold the filling without tearing, thin enough that the bottom (where most layers accumulate) doesn't become too doughy. About 10-12cm diameter circles.
- Place filling in the center. A golf-ball-sized amount — roughly 30-35g. More than you think looks right. The dough stretches.
- Hold the circle in your non-dominant hand, cupped slightly so the filling sinks into the center.
- Start pleating with your dominant hand. Pinch the edge at 12 o'clock and fold it toward the center. Move clockwise (or counterclockwise — whatever feels natural), making small, even pleats about 5mm apart. Each pleat overlaps the previous one slightly.
- Keep rotating the dumpling in your non-dominant hand as you go. The pleats should spiral around the filling naturally.
- When you've gone all the way around, gather the remaining dough at the top and twist it closed. Pinch firmly to seal — any gap and the juice leaks out during cooking.
The Pleat Count Matters
In Georgia, the number of pleats is a point of pride. Fewer than 18 pleats is considered sloppy. A skilled khinkali maker can do 28-32 pleats consistently. It's less about aesthetics and more about function: more pleats means thinner dough at the top, which means a less doughy bite. Don't stress about hitting 28 — focus on making even, consistent pleats and the count will naturally increase as you get faster.
Georgian Dough Work: Simpler Than You Think
Georgian dough culture is fundamentally different from European baking. There are no precise measurements, no fussy techniques, no anxiety about gluten development. Most Georgian doughs are forgiving, fast, and require nothing more than flour, water, salt, and sometimes a bit of oil or yogurt.
| Dough Type | Used For | Key Characteristic | Difficulty |
|---|---|---|---|
| Basic bread dough | Shotis puri, tonis puri, lobiani | Yeasted, soft, slightly sticky. Minimal kneading. | Easy |
| Khachapuri dough | Imeretian, Megrelian | Yogurt/matsoni-based. Tangy, tender. No yeast needed. | Easy |
| Khinkali dough | Khinkali | Just flour, water, salt. Must rest 30+ min. Elastic and smooth. | Medium |
| Puff pastry (penovani) | Penovani khachapuri, achma | Butter-layered. Most people buy it pre-made (no shame in that). | Hard |
| Cornmeal dough | Mchadi, chvishtari | Cornmeal + water (+ cheese for chvishtari). Gluten-free by nature. | Easy |
The most important lesson: Georgian dough is not precious. You don't need a stand mixer, a bench scraper, or a proofing drawer. Most Georgian grandmothers mix dough in a bowl with one hand, knead it for 3-4 minutes on a floured surface, and let it rest under a towel. The matsoni-based khachapuri dough takes literally 5 minutes from start to ready-to-use.
The Fresh Herb Finish
This isn't a single technique so much as a philosophy: Georgian food gets its fresh herbs at the end, not the beginning. This is the single most common mistake people make when cooking Georgian food from recipes. They read "add cilantro and basil" and dump it in with the onions. Wrong. The herbs go in during the last 5-10 minutes of cooking (for stews) or as a raw garnish (for everything else).
The logic is simple. Georgian cuisine uses two layers of flavor from the same herb family: dried spices for depth (ground coriander, dried basil, blue fenugreek) go in early, and their fresh counterparts (fresh cilantro, fresh basil, fresh tarragon) go in late for brightness. You get complexity from the dried layer and freshness from the raw or barely-wilted layer. One without the other tastes incomplete.
| Herb | Dried Form (early) | Fresh Form (late/garnish) | Key Dishes |
|---|---|---|---|
| Coriander/Cilantro | Ground coriander seeds | Chopped fresh cilantro leaves | Almost everything — the backbone of Georgian seasoning |
| Basil | Dried basil (in khmeli suneli blend) | Fresh purple basil leaves | Salads, tomato dishes, as a table herb |
| Fenugreek | Blue fenugreek (utskho suneli) | Not used fresh in Georgia | Walnut dishes, kharcho, stews |
| Tarragon | Dried tarragon (less common) | Fresh tarragon sprigs | Chakapuli, tarkhuna drinks, herb platters |
| Dill | Rarely dried | Fresh dill fronds | Bean dishes, herb platters, potato dishes |
| Summer savory | Dried (in khmeli suneli blend) | Fresh sprigs | Bean dishes (lobio), stews |
Sauce-Making: Tart, Not Rich
Georgian sauces are fundamentally different from Western ones. Where French and Italian cooking build sauces on fat (butter, cream, olive oil), Georgian sauces are built on acidity. Sour plums, pomegranate, vinegar, tamarind — the flavor profile leans tart and bright, not rich and unctuous.
This means Georgian food pairs exceptionally well with heavy, carb-rich sides (bread, potatoes, cornbread) without feeling overwhelming. The acidity cuts through the richness. It's one reason why you can eat an enormous Georgian meal without the same heaviness you'd feel after an equivalent French or American feast.
Tkemali
Sour plum sauce — Georgia's ketchup. Made from green or red tkemali plums with garlic, pennyroyal (ombalo), coriander, and dill. Tart, herby, slightly funky. Goes with everything grilled.
Adjika
Hot pepper paste from Abkhazia. Not just heat — it's a complex fermented paste of red peppers, garlic, walnuts, and spices. Think sriracha's more interesting, less sweet cousin.
Satsebeli
Tomato-walnut sauce. The general-purpose table sauce. Chunkier and more herbal than Italian tomato sauce, with ground walnuts adding body and cilantro adding brightness.
Open-Fire Grilling: Mtsvadi
Georgian grilling (mtsvadi) is minimalist to the point of being philosophical. Take excellent meat. Season it with almost nothing. Grill it over hardwood coals. Serve it with raw onions and tkemali. Done.
This simplicity is deceptive because it means the technique has to be perfect — there's nowhere to hide bad execution. Georgian grillmasters obsess over three things:
- Coal quality. Grapevine cuttings are the gold standard — they burn hot and impart a subtle sweetness. Hardwood charcoal (oak, beech) is second choice. Briquettes are an insult. The coals should be fully white with no visible flame when you start grilling.
- Meat selection. For pork mtsvadi (the most common): neck or shoulder, with visible fat marbling. The fat bastes the meat as it renders. Lean meat = dry mtsvadi. For beef: ribeye or short ribs. For lamb: leg or rack.
- Timing. Turn the skewers frequently — every 2-3 minutes — and listen for the fat dripping onto coals. That sizzle means flavor. Each turn should show deepening color without charring. Total cook time for standard pork cubes: 12-18 minutes depending on size and heat.
The Onion Ritual
Mtsvadi without raw onion isn't mtsvadi. The onions are sliced thin, salted lightly, and sometimes splashed with a bit of vinegar or sumac. You eat them between bites of meat — the sharp, crisp bite cleanses your palate and cuts the richness. Some people also grill whole tomatoes and peppers alongside the meat, which char and collapse into a smoky, juicy condiment.
Lacto-Fermentation & Pickling
Georgian pickling (mzhave) is overwhelmingly lacto-fermented, not vinegar-pickled. The difference matters: lacto-fermentation uses salt and time to cultivate beneficial bacteria that produce lactic acid, giving pickles a complex, tangy sourness that vinegar-pickled vegetables simply can't match. It's also better for your gut, for whatever that's worth.
The basic method for almost all Georgian pickles:
- Prepare a brine. Roughly 30-40g salt per liter of water. Some vegetables (cabbage, green tomatoes) get a stronger brine.
- Add aromatics to the jar. Celery stalks, garlic cloves, hot pepper, and often dried marigold petals or bay leaves. These infuse flavor during the slow ferment.
- Pack vegetables tightly and pour brine over them. Everything must be submerged — anything above the brine line will mold.
- Cover loosely (cloth or lid ajar) and leave at room temperature for 3-7 days depending on the vegetable and temperature. You'll see bubbles — that's the bacteria doing their job.
- Taste daily. When the sourness is right, move to cold storage (fridge or cellar). Fermentation slows dramatically in the cold.
For the full breakdown of every Georgian pickle and preserve, see our complete pickles and preserves guide.
Essential Equipment for Georgian Cooking
You don't need much. Georgian cooking evolved in modest village kitchens, not professional restaurants. Here's what's actually worth buying:
🏺 Ketsi (Clay Pan)
The most useful single investment. Look for unglazed Georgian clay, 25-30cm diameter. Available on Etsy from Georgian sellers or at markets in Tbilisi. A cast iron skillet substitutes for stovetop use.
🪨 Mortar & Pestle
A large, heavy one — stone or hardwood, minimum 15cm diameter. Small spice mortars won't work for walnut paste. The heavy Mexican molcajete works perfectly for Georgian walnut grinding.
🔪 Meat Grinder
For khinkali filling and kupati sausage. A manual hand-crank grinder gives better texture than an electric food processor — coarser, with more bite. Many Georgian homes still use manual grinders.
⚖️ Heavy Weight
For tabaka chicken. A second cast iron pan, a foil-wrapped brick, or a pot filled with water. Needs to be 2-3 kg. You probably already have something that works.
🍢 Metal Skewers
Flat metal skewers (not round — meat spins on round ones) for mtsvadi. About 40-50cm long, 8-10mm wide. Georgian style is wider than most Turkish or Middle Eastern skewers.
🫙 Large Jars
For pickling and fermenting. Wide-mouth glass jars, 2-3 liter capacity. You'll want at least 3-4 if you get into Georgian preserving culture (you will).
Quick Reference: Which Technique for Which Recipe
| Recipe | Primary Technique | Key Tip |
|---|---|---|
| Khinkali | Dough work + pleating | Rest the dough 30+ min. Seal tight or lose the juice. |
| Adjarian Khachapuri | Dough work + shaping | Roll the edges tight to hold the cheese lake. Add egg at the very end. |
| Satsivi | Walnut paste | Serve cold. The sauce thickens as it chills — make it thinner than you think. |
| Chicken Tabaka | Tabaka pressing | Dry the skin. Don't peek for 15 minutes. Heavy weight. |
| Chashushuli | Slow stewing | No added water. Tomatoes and onions provide all the liquid. |
| Mtsvadi | Open-fire grilling | White coals only. Turn every 2-3 min. Fat = flavor. |
| Pkhali | Walnut paste + blanching | Squeeze every drop of water from the greens before mixing. |
| Ojakhuri | Ketsi cooking | Parboil potatoes first. Sear meat separately. Combine in ketsi for the oven. |
Frequently Asked Questions
Can I substitute blue fenugreek?
In a pinch, use regular fenugreek leaves (methi) at half the amount — blue fenugreek is milder and more aromatic. Regular fenugreek can turn bitter if you use too much. There's no perfect substitute, but it's better than nothing.
Do I really need a mortar for walnut paste?
Not strictly, but the texture is noticeably different. A food processor gives you a smoother, more uniform paste. If that's all you have, pulse (don't run continuously) and accept a slightly different result. Many Georgian diaspora cooks use food processors without shame.
Where can I buy a ketsi outside Georgia?
Etsy has several Georgian sellers who ship internationally. Search "Georgian clay pan ketsi." Expect to pay $25-50 for a good one. Alternatively, any unglazed earthenware pan will get you most of the way there — just season it properly first.
What's the most important technique to learn first?
Walnut paste, hands down. It unlocks the most dishes — satsivi, bazhe, pkhali, badrijani, gebzhalia, and a dozen more. Khinkali pleating is fun but only applies to one dish. Walnut paste is the foundation of half the cuisine.
Why does my Georgian stew taste different from restaurants?
Almost always one of two things: you're not cooking the onions long enough (they need 20-30 minutes to go deeply golden, not 5), or you're adding the fresh herbs too early. Dried spices early, fresh herbs in the last 5 minutes. That two-layer approach is the defining flavor profile.
Is Georgian cooking hard?
Honestly, no. It's one of the more forgiving cuisines to cook at home. The ingredients are simple, the techniques are intuitive, and there's very little precision required. Khinkali pleating is the hardest thing, and even that is just practice. If you can make a stew and roll out dough, you can cook Georgian food.
Written by The Georgian Eats Team
We cook Georgian food daily in a Tbilisi kitchen — with a proper ketsi, a mortar that's seen better days, and strong opinions about when to add the cilantro. This guide comes from years of learning by watching, eating, and occasionally ruining dinner.
Last updated: March 2026.
Related Articles
Georgian Spices & Herbs: The Complete Guide
Every spice blend and herb that defines the cuisine — what they taste like and how to use them.
Georgian Bread: Every Type You Need to Know
From the tone oven to mchadi cornbread — the complete guide to Georgia's bread obsession.
Georgian Sauces & Condiments
Tkemali, adjika, satsebeli, and more — the sauces that tie Georgian cuisine together.
Regional Georgian Cuisine
How flavors change from Kakheti to Svaneti — Georgia's incredible regional diversity.